
The VLC media player is an ever changing open source software that’s still the people’s champ for listening and watching many audio/video formats. The default settings of the player already make the vast majority of media look great – let’s make it even better.
Below is an updated guide for VLC Media Player (version 3.0.18 and newer) that walks you through optimizing video quality on Windows, macOS, and Linux. Each section includes the corresponding screenshot from above.
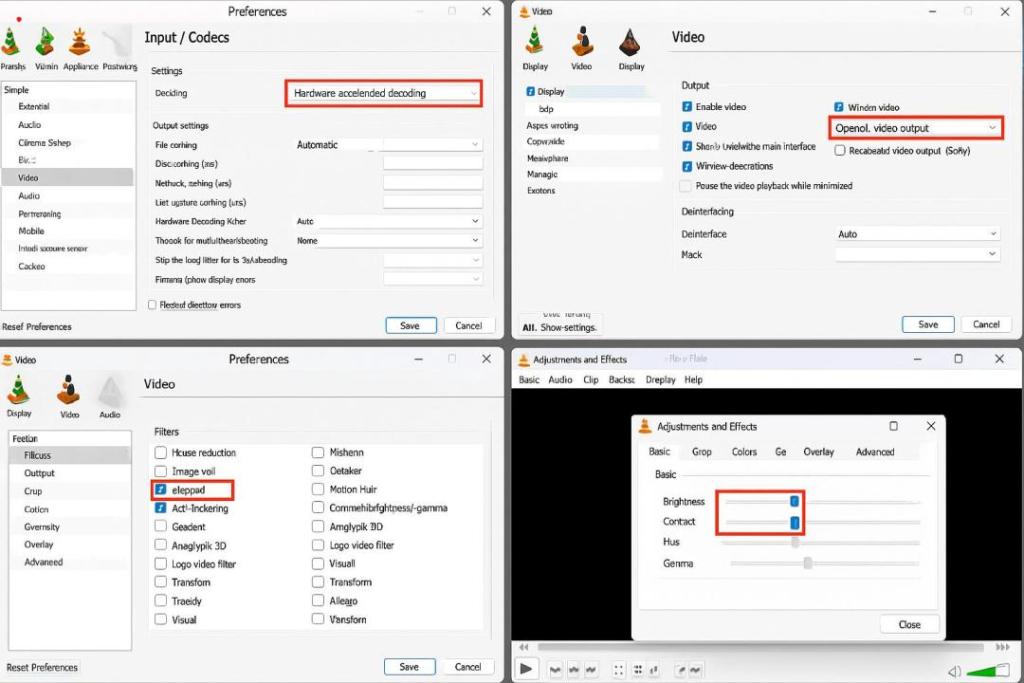
1. Enable Hardware-Accelerated Decoding
Modern GPUs can decode video far more efficiently than CPUs:
- Open VLC Preferences
- Windows/Linux:
Tools > Preferences(or pressCtrl+P) - macOS:
VLC > Preferences(or⌘+,)
- Windows/Linux:
- Switch to Advanced Settings
- At the bottom-left click All to reveal full options.
- Navigate to Input / Codecs
- Under Stream Output, select Input/Codecs.
- Set Hardware-Accelerated Decoding
- In Codecs → Hardware-accelerated decoding, choose Automatic (or your GPU-specific API: DXVA 2.0, NVDEC, VA-API).
- Click Save, then restart VLC.
Result: Offloads decoding to your GPU, reducing stutter and improving playback smoothness.
(See top-left screenshot above.)
2. Choose the Best Video Output Module
Different outputs may give sharper rendering, better colors, or lower latency:
- Back in Preferences, expand Video (under the left sidebar).
- Select Output module
- Choose Automatic for most systems, or OpenGL video output on Windows/macOS, Direct3D11 on recent Windows builds, or X11 on Linux.
- Enable Deinterlacing (if playing interlaced sources)
- Set Deinterlacing to Automatic or Blend for smoother results.
- Save and restart.
Tip: If you notice tearing, try toggling between OpenGL and Direct3D11 (Windows) to see which works best.
(Refer to top-right screenshot above.)
3. Apply Video Filters for Sharpening & Anti-Flicker
VLC’s built-in filters can enhance detail and reduce noise:
- In Preferences, under Video, go to the Filters tab.
- Enable filters:
- Sharpen (improves edge clarity)
- Anti-Flickering (smooths out noisy interlaced or low-bitrate sources)
- Save and restart.
Effect: Noticeable crispness boost on older or compressed videos.
(See bottom-left screenshot above.)
4. Fine-Tune with Video Effects
For per-video adjustments—brightness, contrast, color balance:
- Open Adjustments & Effects
Tools > Effects and Filters(orCtrl+E/⌘+E).
- Basic Tab
- Tweak Brightness, Contrast, Saturation, and Hue using sliders.
- Advanced Tab (Optional)
- Use Sharpen or Denoise sliders for additional clarity or noise reduction.
- Close to apply changes in real time.
Use Case: Great for under-exposed footage or overly flat content.
(Bottom-right screenshot above.)
Additional Tips
- Update VLC regularly to benefit from codec and UI improvements.
- Test different profiles under
Tools > Preferences > Show All > Video > Output modulesif you switch GPUs or OS versions. - Use Extensions like “VLC Enhancer” from the official add-ons site for advanced tuning.
By combining hardware decoding, optimized output, smart filtering, and real-time effects, you’ll maximize VLC’s playback quality and enjoy your videos at their absolute best.